How to calibrate TDIG
board?
1)
Introduction – Where INL comes
from?
STAR TOF system measure time intervals, so the fundamental figure of merit for a TOF system is time measurement accuracy. In STAR, the TDC data system from TOF will be acquiring data into all TDC bins, asynchronously with respect to the TDC clock.
The HPTDC uses tapped delay line architecture to perform its time-sampling function. The 40MHz input clock is multiplied on chip to 320MHz. This 3.125ns clock signal is fed through a 32-tap delay locked loop (DLL). The 97.66ps delay elements of the DLL are CMOS gates with voltage controlled delay. Voltage feedback from the DLL controller maintains a delay through all 32 delay elements that is equal to one 3.125ns clock period.
The DLL tap intervals are further subdivided by a 4-tap resistor-capacitor (RC) delay network. All four RC taps are sampled when an input occurs, and an interpolation determines which tap pair showed a clock transition during the sampling interval. This final subdivision results in bin widths of 24.41ps. The arrival time of data pulses coming into the HPTDC are compared with how far the 320MHz clock has propagated through the DLL and RC networks: this position gives a time of arrival relative to the 320MHz clock, with a nominal resolution of 24.41ps. The 320MHz clock also drives a digital counter, and the combination of the counter value, the DLL value, and the interpolated 24.41ps RC data gives a time of arrival relative to the counter reset.
As a result, the acquired data will be distorted by the three types of nonlinearities present in the HPTDC.
a) Unequal bin widths in the RC tapped delay lines.
b) Unequal bin widths in the DLL.
c) Noise coupling from the logic clock network (40MHz) within the chip into the sampling clock network (320MHz)
The RC nonlinearity is periodic over 4 bins, the DLL nonlinearity is periodic over 32bins, and the clock feed through nonlinearity is periodic over 1024 bins. In all cases, these effects are deterministic and periodic for a given chip. As a result, these effects can be measured statistically and corrected for both on and off chip.
On chip, all 8 TDC channels use a common 32 tap DLL circuit and a 3-bit register for each tap adjusts the effective tap width. Each TDC channel uses a different 4-tap RC delay line, but there is one set of adjustment registers common to all 8 RC delay lines. Using the code density test described below, the RC and DLL adjustments can be optimized, either for a single channel or globally across all 8 channels.
However, our higher level test (using random data into 2 channels with a constant delay) shows that the clock noise coupling dominates once the DLL and RC adjustments have been made to eliminate gross bin width variation.
2) How to measure INL on HPTDC?
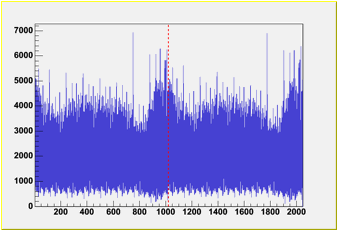
A standard technique for statistical bin width measurement is called a code density test: a pulse generator running asynchronously with respect to the TDC produces pulses that arrive with a uniform random distribution with respect to the TDC clock. If all TDC bins were the same width, then the probability of a pulse arriving in any bin would be the same as that for any other bin, and a histogram of all bins would be flat (except for the statistical variation in the input distribution, which decreases with the number of hits per bin.)
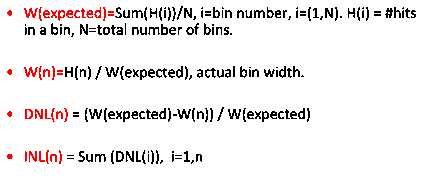
Given enough hits that the expected input statistics are effectively flat, and then bin value variations are a direct measure of bin width variation. Relative bin widths are read directly from the relative bin values in the code density test histogram. The following plot shows typical results of a code density test.
The nominal
or expected bin width in the code density test is just the number of hits in
each bin, if each bin had the same number of hits (the total number of inputs
divided by the number of bins):
3)
Rice setup.
All STAR TOF TDIG board are calibrated at Bonner lab, Rice University using a cable delay test setup showing as following:

a) Pulse generator
Generate and output signal: +3V, 60ns width, 293us period. This signal is split to two, one is connected to TCAL as input for TDIG, and two is reverted to negative and input to THUB as trigger signal.
It is proved that when use 400ns width signal; we can use the same
signal to input to TCAL for calibration and input to THUB as trigger, so we
don�t need to use a long cable (~400ns) and reverse the signal for trigger.
Cable connected to pulse generator: 1 output signal which is split to
two by a �T� to TCAL and to THUB.
b) TCAL
This board is designed by Bonner lab, Rice University, which used for TDIG calibration. It received a pulse signal and output 3 groups of 8 signals which are identical to the input pulse. In each group of 8 output pulses, the signal is delayed by about 63ns, which input the 8 channels of TDC on HPTDC. With 63ns delay, the crosstalk within TDC channels could be ignored.
TCAL connection: connect to TDIG directly, LV power cable, input pulse signal.
c) TDIG board
They are production boards for TOF system; the setup can install and calibrate 8 TDIG boards in one data taken run if necessary. The way to connect TDIG board with TCPU is same as the way TDIG board connected with TCPU in STAR TOF system.
Normally we only connect 4 TDIG boards for calibration, 2 on TCPU J4 and 2 on TCPU J5. When you only test one TDIG board, you should connect it to J4.
TDIG connections: upstream and downstream ribbon cable to TCPU J4/J5, correct jumper on JU1 JU2 JU3 JU10 J17 SW4.
Refer to support material for jumper setup on TDIG boards.
d) TCPU is the production board for TOF system.
TCPU connections: LV cable, can-bus cable, ribbon cable on J4/J5, cat6 clock cable, jumper on JU1 JU2.
Refer to support material for jumper setup on TCPU boards.
e) THUB is a prototype THUB for TOF system, so only some old version of firmware can be used. TDIG board and TCPU should use the same version of firmware. So for a board (TDIG or TCPU) with different firmware, we need to upload the old workable version firmware before we can calibrate TDIG or test TCPU before the prototype THUB can work under the latest firmware. The firmware for TDIG and TCPU are saved in the windows PC next to the TDIG calibration setup.
THUB connections: LV cables, can-bus cable, cat6 clock cable, trigger signal cable, data fiber.
f) The DAQ machine is a Linux box. It must run under Scientific Linux 4 or higher and pcan driver must be installed. Following the link to install pcan driver: http://www.peak-system.com/fileadmin/media/linux/index.htm
The DAQ machine is toftest.rice.edu, now the working account is �root�, someone should transplant the calibration work to user account �tofr� or �teststand�.
The DAQ machine is connected with THUB by fiber through SIU card for data stream,
And it is also connected with THUB and TCPU by Can-Bus cable for control.
DAQ machine connections: can-bus cable, data fiber.
4)
Data
taken.
After everything connected, the order to turn power on is THUB�TCPU�TDIG before data taken.
Before you turn on power, opening several x-terminals on DAQ machine is recommended, e.g. we open 4 x-terminals, call them x1, x2, x3, x4. After login root@toftest.rice.edu, in x1, you type:
cd pcan
./pcanloop
It will detect the pcan device and ready to send/receive can-bus command, the following messages should show up in x1:
Trying
to open PCAN devices with BTR0BTR1=0x0014
Device at /dev/pcan32: Hardware ID = 0xff
pcanloop: driver version = Release_20080220_n
That means the can-bus device is connected correctly.
After power on THUB�TCPU�TDIG, you should see the following in x1 (example with only 1 TDIG):
pcanloop: message received : 255 m s 0x00000407
4 0xff 0x00 0x00
0x00
pcanloop: message received : 255 m s 0x00000207
4 0xff 0x00 0x00
0x00
pcanloop: message received : 255 m e 0x041c0020
4 0xff 0x00 0x00
0x00
The first line means THUB is seen by Can-Bus, the second line means TCPU is seen by Can-Bus, the third line means 1 TDIG is seen by Can-Bus. If you connect more than 1 TDIG board, you will see more lines similar to the third line.
Then you can go to terminal x2, and type the following commands line by line (statements after arrow are comments, no need to type in):
./pc "m s 0x404 1 0x91"
./pc "m s 0x202 3 0xe 0x2 0xf" � connect TCPU to serdes
./pc "m s 0x402 2 0x91 0x81" � connect THUB to serdes
./pc "m s 0x404 1 0x91" � check the serdes connection
./pc "m s 0x402 2 0x80 0x3" � turn on trigger
Sometimes, you need to type:
./pc "m s 0x202 5 0xe 0xe 0x10 0xe 0x0" � reset tcpu
You should expect to see the following in terminal x1:
pcanloop: message assembled: 255 m s 0x00000404
1 0x91
pcanloop: message received : 255 m s 0x00000405
1 0x80
pcanloop: message assembled: 255 m s 0x00000202
3 0x0e 0x02 0x0f
pcanloop: message received : 255 m s 0x00000203
2 0x0e 0x00
pcanloop: message assembled: 255 m s 0x00000402
2 0x91 0x81
pcanloop: message received : 255 m s 0x00000403
2 0x91 0x00
pcanloop: message assembled: 255 m s 0x00000404
1 0x91
pcanloop: message received : 255 m s 0x00000405
1 0x81
pcanloop: message assembled: 255 m s 0x00000402
2 0x80 0x03
pcanloop: message received : 255 m s 0x00000403
2 0x80 0x00
Now the whole setup is ready for calibration data taken.
Go to x-terminal x3, and go to directory:
/root/ddl/tofrorc_vers.5.2.1/Linux, then type command:
./rorc_receive -r 3 -x 0 -h rawdata/tdig-n1-n2-n3-n4.dat -e 6000000
The data taken will be in process, the data will be saved at /data/rawdata/, after finish 6000000 pulses (normally about half an hour if you run pulse of 283us period), the data taken will stop automatically. To check if the data is reasonable during or after the data taken, you can go to x-terminal x4, and type: od -t x4 filename to check. The data are saved in binary and you can see all the separators and timestamps, as well as geographical words, trigger words depends on the configuration.
5)
Run
setup with different configuration.
Sometimes, we need to take data with TPMD and PMT with only several channels and with both trailing edge and leading edge data. Special configuration file are necessary, to learn how to make a configuration, a lot of manual needs to be read. It is not part of the TDIG calibration, so I won�t include the detail instructions here.
Normally there are several ways to change the configuration file.
a) Modify the firmware source code, which required compile and re-build the firmware.
A typical configuration file looks like:
http://www.bonner.rice.edu/~liuj/TDIG-calib-howto/bitConfig.txt
b) Modify the configuration file directly by MS-Excel and save it, and then read configuration file by Can-Bus to TDIG/TCPU. The configuration file looks like:
http://www.bonner.rice.edu/~liuj/TDIG-calib-howto/HPTDC JTAG configurator LWB defaults MAY10 2007.xls
c) Use a python code to modify configuration file then read into TDIG/TCPU.
6)
Data
Analysis.
After finish data taken, there is an analysis code to produce INL and some QA plots.
All the codes are saved /data/analysis; there are three pieces of code to analyze the data.
inl_analysis.cxx, to read in the data file and produce all the INLs of all channels for all the TDIG boards in the data file.
corr_analysis.cxx, to read in the data file and INL tables produced in last analysis and then produce all cable delay test results.
summary_analysis.cxx, to read the cable delay test results and produce summary plots.
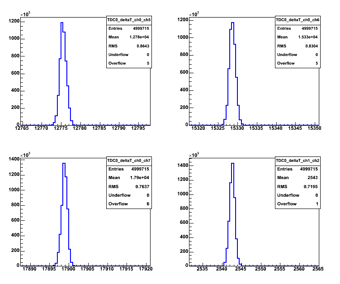
The following plot is the results of inl_analysis.cxx
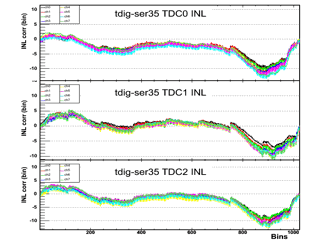
The above plots show all the INL tables for 24 channels in 3 TDCs of one TDIG board.
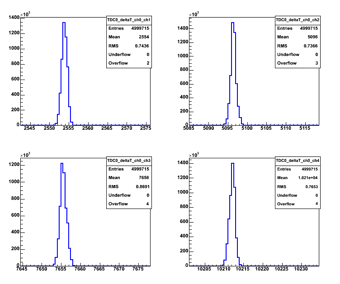
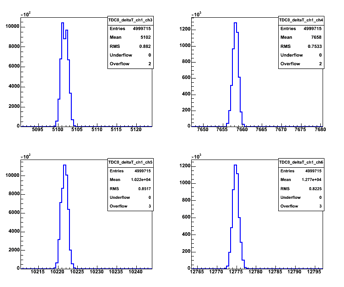
The code corr_analysis.cxx will produce the cable delay test result between any two channels of the same TDC. So each TDC will have 28 plots to check the results and the time resolution as following:


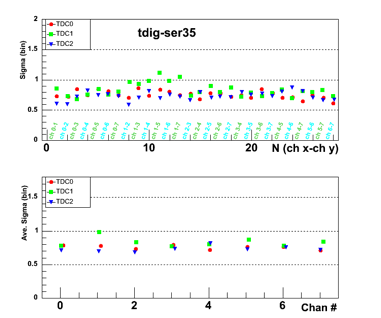
The code summary_analysis.cxx will produce the summary plots for all TDC channel in one TDIG board like following:
7)
Support material
High Performance Time to Digital Converter - Manual v2.2 for HPTDC v1.3
TCPU Rev C Engineering and User's Manual - version 6.0a
TOF CANbus High Level Protocol (HLP) - version 3l
TDIG Rev F Engineering and User's Manual - version 4.0a
TOF Fiber Data Format - version 2.4
PCAN-driver for Linux - version 6.9 by Peak System Technik GmbH